
How I Self-Hosted an AI Automation Stack on Hetzner Using Coolify (n8n + Postgres + MinIO + NocoDB + More)
If you’re searching for a practical, real-world guide to self-hosting n8n on Hetzner using Coolify,
and you want a complete stack (database, storage, automation tools) you can expand for any AI workflow—this is exactly what I did,
step-by-step, with the same Docker Compose file that worked for me.
Helpful resources on QuickLifeSolutions:
This setup is ideal if you want to build automations like:
AI content pipelines, lead capture + CRM sync, data scraping → storage → dashboards,
voice + TTS workflows, and anything you can imagine with automation building blocks.

What I Built (Stack Overview)
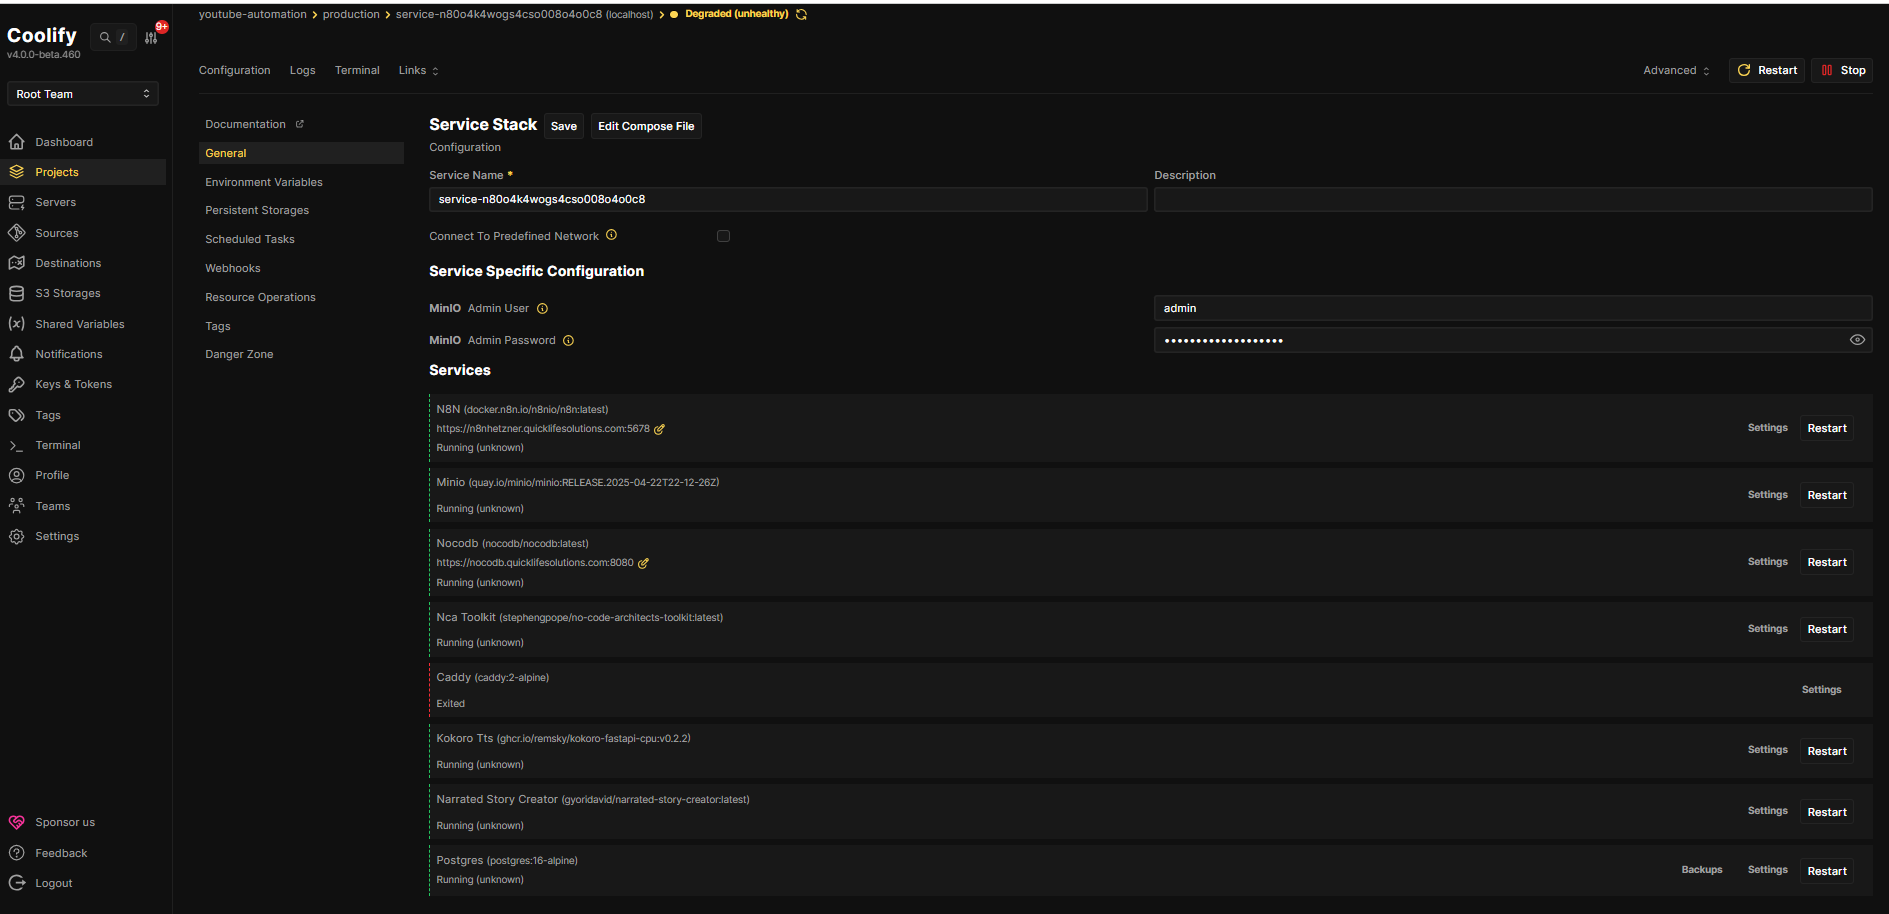
I deployed a full automation platform using Docker Compose on a Hetzner server, managed through Coolify:
- n8n – Workflow automation engine (the brain of the system)
- PostgreSQL – Database for n8n (reliable, production-friendly)
- MinIO – S3-compatible object storage (files, audio, exports, AI assets)
- NocoDB – Airtable-like UI on top of data (easy tables, quick admin views)
- No-Code Architects Toolkit – Utility services (API + S3 integration)
- Kokoro TTS – Text-to-speech API service
- Narrated Story Creator – A ready service for story/audio workflow style automation
The key win: once this foundation is live, you can keep adding services without rebuilding everything.
It becomes your personal “automation cloud.”
My Domain + CDN Setup (Namecheap + Cloudflare)
I bought my domain from Namecheap and used Cloudflare as the CDN/proxy in front of the server.
The basic flow looked like this:
- Buy domain from Namecheap
- Change nameservers in Namecheap to Cloudflare nameservers (so Cloudflare manages DNS)
- Add an A record in Cloudflare pointing your subdomain or root domain to your server IP
- Configure Cloudflare settings (SSL/TLS) so HTTPS works properly with your origin setup
Important note: whenever you connect IP → domain, make sure you update any “public URL” environment variables
(like n8n webhook URLs) to match the final domain. Otherwise webhooks and callbacks break.
The Server I Chose (Hetzner Specs)
I purchased a Hetzner server with these specs:
- 8 vCPU
- 16 GB RAM
- 320 GB local disk
- ~20 TB traffic out
This is more than enough to run n8n + databases + storage + a few AI microservices with comfort, and still have room to scale.
Step 1: SSH Key Setup (From My Local PC Using PowerShell)
Before I created the server, I generated an SSH key from my local machine, then added the .pub key to Hetzner.
That way I could log in securely without passwords.
Generate SSH Key (PowerShell)
ssh-keygen -t ed25519 -C "[email protected]"
After generating it, I copied the public key (id_ed25519.pub) and pasted it into Hetzner’s SSH key section.
Then I created the server and waited for it to become reachable.
Step 2: Connect to the Hetzner Server
Once the server was up, I connected from my local machine and confirmed SSH access was working.
ssh root@YOUR_SERVER_IPIf you’re using a non-root user (recommended), you’d connect with that username instead.
Step 3: Install Coolify (Single Command)
Coolify is the reason this setup feels “easy.” Instead of manually managing Docker services, reverse proxy rules,
deployments, and environment variables in a messy way, Coolify gives you a clean UI to:
- Deploy Docker Compose stacks
- Manage environment variables
- Restart services
- View logs
- Update deployments without pain
I installed Coolify using the official one-liner:
curl -fsSL https://cdn.coollabs.io/coolify/install.sh | sudo bashAfter installation, I accessed the Coolify dashboard using:
http://YOUR_SERVER_IP:8000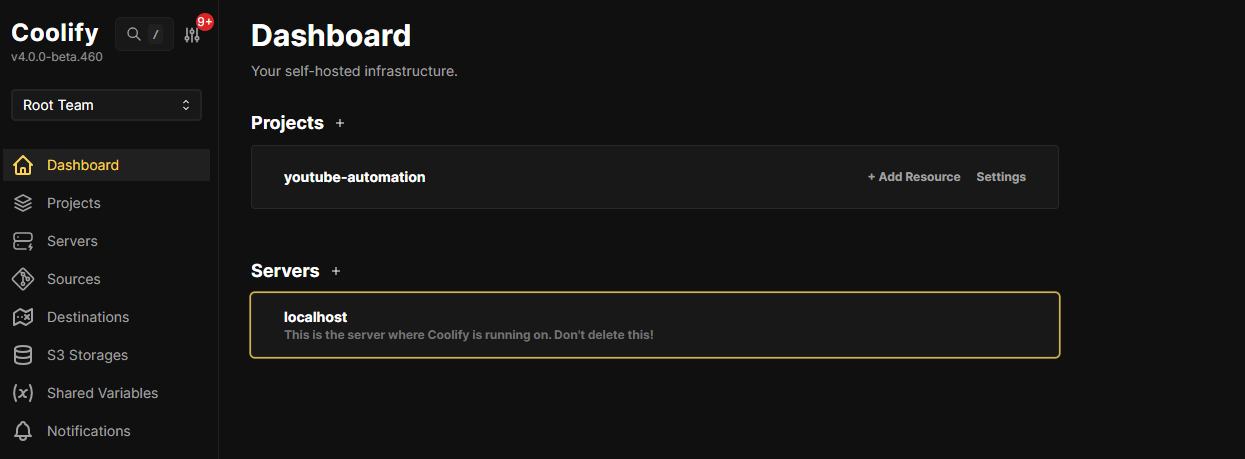
Step 4: Deploy My Docker Compose Stack in Coolify
This is exactly what I did inside Coolify:
- Create a new Project
- Click Add Resource
- Select Docker Compose
- Choose an empty compose resource
- Paste my Docker Compose file
- Add required environment variables (important!)
- Deploy
Once deployed, I had a complete automation stack ready for real work.
The Docker Compose File (The Same One That Worked for Me)
Here’s the exact compose file you shared (kept intact). If you use this, you must set the environment variables
that are referenced with $.
version: '3.8'
services:
n8n:
image: 'docker.n8n.io/n8nio/n8n:latest'
container_name: n8n
ports:
- '5678:5678'
environment:
WEBHOOK_URL: 'https://n8nhetzner.quicklifesolutions.com'
N8N_EDITOR_BASE_URL: 'https://n8nhetzner.quicklifesolutions.com'
N8N_HOST: 0.0.0.0
N8N_PROTOCOL: http
N8N_PORT: '5678'
N8N_PROXY_HOPS: '1'
EXECUTIONS_TIMEOUT: '0'
EXECUTIONS_TIMEOUT_MAX: '0'
N8N_RUNNERS_MAX_CONCURRENCY: '1'
N8N_HTTP_REQUEST_TIMEOUT: '300000'
N8N_BINARY_DATA_STORAGE_MODE: filesystem
N8N_BINARY_DATA_STORAGE_PATH: /home/node/.n8n/binary_data
N8N_RUNNERS_ENABLED: 'false'
DB_TYPE: postgresdb
DB_POSTGRESDB_HOST: postgres
DB_POSTGRESDB_PORT: '5432'
DB_POSTGRESDB_DATABASE: n8n
DB_POSTGRESDB_USER: n8n
DB_POSTGRESDB_PASSWORD: '${POSTGRES_PASSWORD}'
volumes:
- 'n8n-data:/home/node/.n8n'
- '/path/to/import:/import'
networks:
- network
restart: unless-stopped
depends_on:
- postgres
healthcheck:
test:
- CMD
- node
- '-e'
- "require('http').get('http://127.0.0.1:5678/healthz', r=>process.exit(r.statusCode===200?0:1)).on('error',()=>process.exit(1))"
interval: 30s
timeout: 5s
retries: 5
start_period: 60s
minio:
image: 'quay.io/minio/minio:RELEASE.2025-04-22T22-12-26Z'
container_name: minio
ports:
- '9000:9000'
- '9001:9001'
environment:
MINIO_ROOT_USER: '${MINIO_ROOT_USER}'
MINIO_ROOT_PASSWORD: '${MINIO_ROOT_PASSWORD}'
volumes:
- 'minio-data:/data'
command: 'server /data --console-address ":9001"'
networks:
- network
restart: unless-stopped
nocodb:
image: 'nocodb/nocodb:latest'
container_name: nocodb
ports:
- '8008:8080'
volumes:
- 'nocodb-data:/usr/app/data'
networks:
- network
restart: unless-stopped
postgres:
image: 'postgres:16-alpine'
container_name: n8n-postgres
environment:
POSTGRES_USER: n8n
POSTGRES_PASSWORD: '${POSTGRES_PASSWORD}'
POSTGRES_DB: n8n
volumes:
- 'postgres-data:/var/lib/postgresql/data'
networks:
- network
restart: unless-stopped
nca-toolkit:
image: 'stephengpope/no-code-architects-toolkit:latest'
container_name: nca-toolkit
environment:
API_KEY: '${NCA_API_KEY}'
S3_ENDPOINT_URL: 'http://minio:9000'
S3_ACCESS_KEY: '${S3_ACCESS_KEY}'
S3_SECRET_KEY: '${S3_SECRET_KEY}'
S3_BUCKET_NAME: quicklifesolutions
S3_REGION: us-east-1
GUNICORN_TIMEOUT: '360000'
depends_on:
- minio
networks:
- network
restart: unless-stopped
kokoro-tts:
image: 'ghcr.io/remsky/kokoro-fastapi-cpu:v0.2.2'
container_name: kokoro-tts
networks:
- network
restart: unless-stopped
narrated-story-creator:
image: 'gyoridavid/narrated-story-creator:latest'
container_name: narrated-story-creator
ports:
- '8010:8000'
networks:
- network
restart: unless-stopped
volumes:
n8n-data:
driver: local
minio-data:
driver: local
nocodb-data:
driver: local
postgres-data:
driver: local
networks:
network:
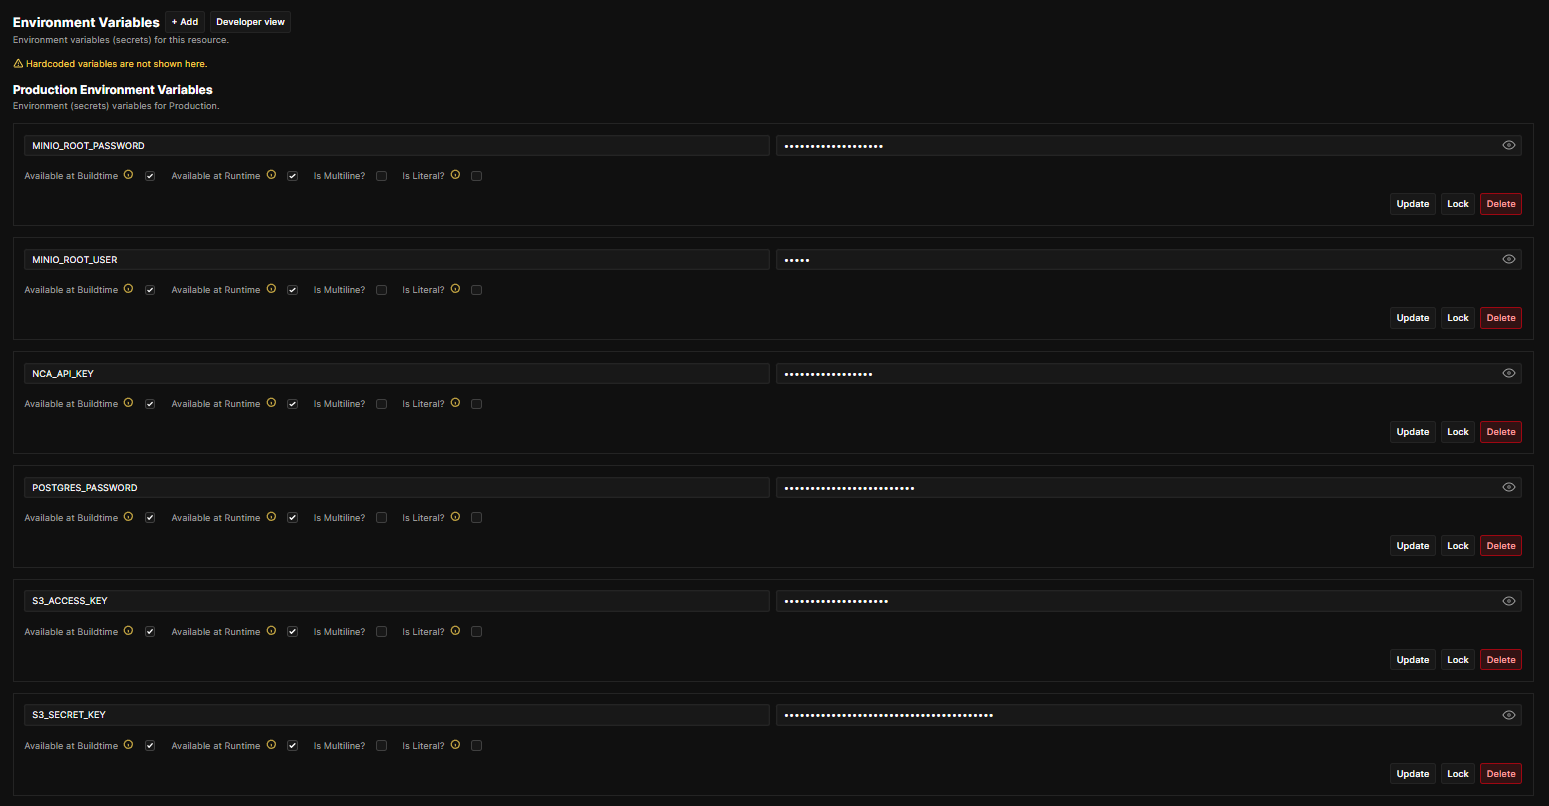
driver: bridgeCritical Step: Environment Variables You MUST Set
Your compose references these variables:
POSTGRES_PASSWORDMINIO_ROOT_USERMINIO_ROOT_PASSWORDNCA_API_KEYS3_ACCESS_KEYS3_SECRET_KEY
In Coolify, you add these under the resource’s environment variables, then deploy.
If any of these are missing, one or more services will fail.
What Each Service Does (Simple + Practical Explanation)
n8n (Automation Engine)
n8n is the main workflow builder. You connect triggers (webhooks, schedules, forms) to actions (APIs, databases, AI tools).
It’s what lets you build automations without constantly writing custom code.
PostgreSQL (Database)
Postgres is where n8n keeps workflows, credentials, execution history, and settings—this is what makes the setup stable.
MinIO (S3 Storage)
MinIO is your private S3-like storage—perfect for saving files generated by automations (audio, images, exports, CSV, PDFs).
NocoDB (Data UI)
NocoDB gives you a spreadsheet-style UI to manage data—handy when you want quick tables and admin views without coding.
No-Code Architects Toolkit
A utility service that can interact with S3 (MinIO) and support automation workflows that need API-based processing.
Kokoro TTS
A text-to-speech microservice—great for voiceovers, narrated content, and audio generation in automation pipelines.
Narrated Story Creator
A ready-to-run service for narrated story workflows. In your compose, it maps 8010:8000.
Important Notes / Gotchas (Don’t Skip These)
1) Update hostnames when you link your domain
When Cloudflare points your domain to your server, update:
WEBHOOK_URL and N8N_EDITOR_BASE_URL.
This prevents broken webhooks and callback URLs.
2) Replace placeholder mounts
Your n8n compose includes:
/path/to/import:/import
Replace /path/to/import with a real folder path on the server, or remove it.
3) Port access matters
If you’re exposing services publicly, make sure your firewall/security group allows only what you need.
Many people keep only the Coolify proxy and n8n public, and keep MinIO / Postgres internal.
Frequently Asked Questions (FAQ)
Is Hetzner good for self-hosting n8n?
Yes—Hetzner gives strong CPU/RAM for the price, which is perfect for n8n plus databases and a few supporting services.
For heavy workloads (lots of executions + AI media generation), you can scale up later.
What exactly is Coolify and why use it?
Coolify is a self-hosted platform that makes deployments easier. You can deploy Docker Compose stacks, manage env vars,
view logs, and redeploy without living inside terminal commands all day.
Do I need Cloudflare to make this work?
You don’t “need” it, but it helps a lot: DNS control, SSL flexibility, CDN caching for public pages, and better protection.
If you use Cloudflare, make sure your domain points to the correct IP via A record.
Why do I need Postgres for n8n?
Postgres stores n8n workflows and execution history reliably. It’s more stable than lightweight alternatives when you’re
running production automations.
What is MinIO used for in this stack?
MinIO is S3-compatible storage. It’s useful for keeping generated files—audio, exports, reports, images—anything your
automation creates and needs to store.
What happens if I forget the environment variables?
One or more services won’t start properly. This stack depends on secrets like Postgres password and MinIO credentials.
Set them inside Coolify before deploying.
Can I run everything on one server?
Yes, that’s exactly what I did. Later, if your workflows grow (many executions, many users, large media generation),
you can split Postgres and storage to separate servers.
What should I change in the Docker Compose before deploying?
Update your domain-related variables like WEBHOOK_URL and N8N_EDITOR_BASE_URL,
and replace /path/to/import with a real path (or remove it).
Is this setup good for AI automations?
Yes. n8n handles workflows, Postgres stores state, MinIO stores files, and services like TTS make it easier to build content pipelines.
It’s a solid foundation for most AI automation use-cases.
Final Thoughts
This is one of the cleanest ways to learn self-hosting while building something you’ll actually use daily.
You’re not just installing tools—you’re building your own automation platform you can grow forever.
Want Us To Set This Up For You?
If you want the same Hetzner + Coolify + automation stack setup done professionally for you,
we charge $200 for the complete setup.
Send an email to [email protected] if you’re interested.
Next Blog Coming Up
In my next blog, I’ll use the same AI stack deployed on Hetzner to build an
automated AI long-form content pipeline for revenge stories using
n8n, NocoDB, YouTube,
Narrated Story Creator, and the NCA Toolkit.
I’ll share the exact workflow, automation design, and how everything connects end-to-end.
Connect With Us
- YouTube: Visit our channel
- Instagram: Follow us on Instagram
- AI Newsletter: Subscribe to our newsletter
- Free Consultation: Book a free consultation call
- More Tools: Explore our Apify actors
- Discord: Raise a Support ticket here
- Contact Email: [email protected]